ควบคุม Delta Robot ผ่านโดยใช้ Web Serial Port
ต่อจากบทความเรื่อง ทำความรู้จักกับ Delta Robot
Delta Robot Serial Control
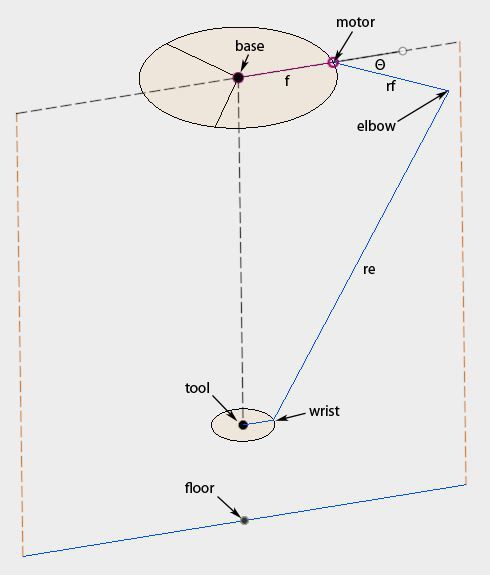
Robot Parameters
| Base Radius (f) | |
|---|---|
| End Effector Radius (e) | |
| Bicep Length (rf) | |
| Forearm Length (re) | |
| Base to Floor Distance (b) |
Input Motor Angles (Forward Kinematics)
| Motor 1 (θ1) | |
|---|---|
| Motor 2 (θ2) | |
| Motor 3 (θ3) |
Output Position (X, Y, Z)
| X | |
|---|---|
| Y | |
| Z |
Input Position (Inverse Kinematics)
| X | |
|---|---|
| Y | |
| Z |
Output Motor Angles
| Motor 1 (θ1) | |
|---|---|
| Motor 2 (θ2) | |
| Motor 3 (θ3) |
Serial Communication
Select Mode:
Output
Waiting for command...
โค้ด Arduino Firmware
#include <Servo.h>

// กำหนดขาที่เชื่อมต่อกับเซอร์โว
const int servo1Pin = 9;
const int servo2Pin = 10;
const int servo3Pin = 11;

// สร้างออบเจ็กต์สำหรับเซอร์โว
Servo servo1;
Servo servo2;
Servo servo3;

// ตัวแปรสำหรับเก็บมุมของเซอร์โว
float theta1 = 0.0;
float theta2 = 0.0;
float theta3 = 0.0;

void setup() {
  // เริ่มต้น Serial Communication
  Serial.begin(115200);

  // ติดตั้งเซอร์โวไปยังขาที่กำหนด
  servo1.attach(servo1Pin);
  servo2.attach(servo2Pin);
  servo3.attach(servo3Pin);

  // ตั้งค่าเริ่มต้นของเซอร์โว (มุม 90 องศา)
  servo1.write(90);
  servo2.write(90);
  servo3.write(90);

  // แสดงข้อความเมื่อเริ่มต้น
  Serial.println("Arduino Delta Robot Control Ready!");
}

void loop() {
  // ตรวจสอบว่ามีข้อมูลเข้ามาทาง Serial หรือไม่
  if (Serial.available() > 0) {
    String gcode = Serial.readStringUntil('\n'); // อ่านข้อมูลจนถึงตัวขึ้นบรรทัดใหม่
    gcode.trim(); // ลบช่องว่างหรือตัวอักษรที่ไม่จำเป็นออก

    // ตรวจสอบว่าข้อมูลเป็นคำสั่ง G-Code หรือไม่
    if (gcode.startsWith("G0")) {
      parseGCode(gcode); // แยกคำสั่ง G-Code
    }
  }
}

// ฟังก์ชันสำหรับแยกคำสั่ง G-Code และควบคุมเซอร์โว
void parseGCode(String gcode) {
  // แยกค่า X, Y, Z จากคำสั่ง G-Code
  int xIndex = gcode.indexOf('X');
  int yIndex = gcode.indexOf('Y');
  int zIndex = gcode.indexOf('Z');

  if (xIndex != -1 && yIndex != -1 && zIndex != -1) {
    // ดึงค่ามุมจากคำสั่ง G-Code
    theta1 = gcode.substring(xIndex + 1, yIndex).toFloat();
    theta2 = gcode.substring(yIndex + 1, zIndex).toFloat();
    theta3 = gcode.substring(zIndex + 1).toFloat();

    // ส่งค่ามุมไปยังเซอร์โว
    servo1.write(theta1);
    servo2.write(theta2);
    servo3.write(theta3);

    // แสดงผลใน Serial Monitor
    Serial.print("Servo Angles: ");
    Serial.print("Theta1 = ");
    Serial.print(theta1);
    Serial.print(", Theta2 = ");
    Serial.print(theta2);
    Serial.print(", Theta3 = ");
    Serial.println(theta3);
  }
}
คำอธิบายโค้ด:
-
การใช้งานไลบรารี
Servo:-
ไลบรารี
Servoช่วยให้เราสามารถควบคุมเซอร์โวได้ง่าย โดยการกำหนดมุมที่ต้องการให้เซอร์โวหมุนไป
-
-
การกำหนดขาเชื่อมต่อ :
-
เซอร์โวแต่ละตัวถูกเชื่อมต่อกับขา PWM ของ Arduino (ขา 9, 10, และ 11)
-
-
การรับข้อมูลผ่าน Serial :
-
โปรแกรมจะรอรับข้อมูลจาก Serial Communication เมื่อได้รับข้อมูล จะตรวจสอบว่าเป็นคำสั่ง G-Code (
G0) หรือไม่
-
-
การแยกคำสั่ง G-Code :
-
ฟังก์ชัน
parseGCodeจะแยกค่ามุมจากคำสั่ง G-Code เช่นG0 X10.00 Y20.00 Z30.00และแปลงค่าเหล่านั้นเป็นตัวเลขทศนิยม
-
-
การควบคุมเซอร์โว :
-
ค่ามุมที่ได้รับจะถูกส่งไปยังเซอร์โวผ่านฟังก์ชัน
write()ของไลบรารีServo
-
-
การแสดงผลใน Serial Monitor :
-
โปรแกรมจะแสดงค่ามุมที่ส่งไปยังเซอร์โวใน Serial Monitor เพื่อตรวจสอบการทำงาน
-
การทำงานร่วมกับโค้ด HTML:
-
เมื่อคุณกดปุ่ม "Send G-Code (Forward Kinematics)" หรือ "Send G-Code (Inverse Kinematics)" ในหน้าเว็บ โค้ด JavaScript จะส่งคำสั่ง G-Code ผ่าน Web Serial API ไปยัง Arduino
-
Arduino จะรับคำสั่ง G-Code และแยกค่ามุมเพื่อควบคุมเซอร์โวตามที่ระบุ
การทดสอบ:
-
อัปโหลดโค้ด Arduino ไปยังบอร์ด Arduino UNO
-
ทำการเชื่อมต่อ Serial ผ่านปุ่ม "Connect Serial"
-
กดปุ่ม "Send G-Code" เพื่อส่งคำสั่งไปยัง Arduino
-
ตรวจสอบ การทำงานของเซอร์โวว่า หมุนไปยังมุมที่กำหนด หรือไม่